Bin Packing Algorithm Visualization: Tutorial
Web DemoView the Project on GitHub
Introduction
This project was created for CS 4445: Analysis of Algorithms II, taught by Roberto Solis-Oba at The University of Western Ontario. This tutorial is based on the report I did for the project.
What is Bin Packing?
The goal of this project is to show the Next Fit, First Fit, Best Fit, and Worst Fit approximation algorithms for bin packing, in order to better understand and improve those algorithms. The bin packing problem is conceptually fairly simple. We are given N items and their corresponding sizes s1, s2, ..., sN . The size of any item i, denoted si, is constrained such that 0 < si ≤ 1. We must put the items into bins of size 1, with the goal of using the fewest number of bins possible.
Why Unity?
I chose to implement the animation system in Unity using C# because I am familiar with the work environment, and because using Unity makes the creation of UI and animations fairly easy. Unity does come with some overhead, but since the algorithms have been deliberately slowed down for animation purposes, I figured that any performance cost from using Unity would not be a critical factor.
Tutorial
The first step of my project implementation was to implement Next Fit, First Fit, Best Fit, and Worst Fit in C# without any animation. This was a fairly standard process. I created a Bin class to act as a simple data structure representing a bin. This class contains a list of floating point values representing the items stored in the bin, and a floating point value to represent the remaining capacity of the bin. It also included two functions, CanFit which tests whether an item can fit in the bin, and Add, which adds an item to the bin. (See Bin.cs on GitHub)
I then created a static class called BinPacking with four static functions, one for each algorithm. Each of these functions takes a List of floating point values as input, representing item sizes, and returns a list of Bins in which those item sizes are stored. This was in order to test the basic C# implementations, and these algorithms were later modified to run more slowly and show each step in the packing process. (See BinPacking.cs on GitHub)
In order to test the algorithms in the BinPacking class, I created a simple Test class which ran each algorithm and printed the contents of the bins to the console. (See Test.cs on GitHub)
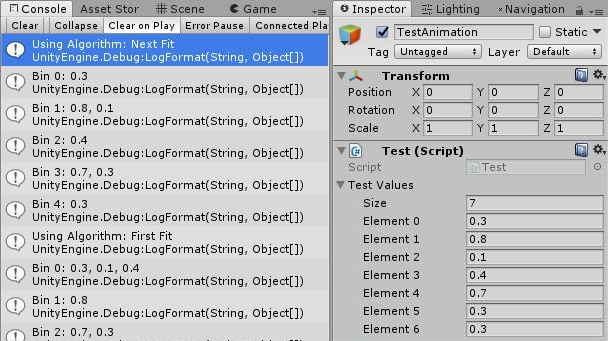
After testing to make sure the basic algorithms appeared to be working, I began the process of animation. First, I created a class called BinPackingAnimation, and copied over the contents of the class BinPacking as a starting point.
In order to slow down an algorithm so that the process can be seen, I split each one into two functions: a co-routine containing the algorithm code, and an animation function which started that co-routine. Using co-routines allows me to insert some code which causes the process to sleep between consecutive iterations of the main loop.
yield return new WaitForSeconds(0.3f);I started off with a basic design. For the first iteration, I decided to use sliders in order to show the bins filling as the algorithm progressed. Sliders are a Unity UI element which essentially just controls the width of an image, by altering a value which goes from 0 to 1 by default.
I added some extra fields to the class which would be useful for dealing with the UI. It was created in the Unity editor, along with a UI canvas and the binHolder which had a grid layout group. The grid layout component makes it so that children of that component are positioned in a grid within some defined parameters.
public GameObject binPrefab;
public Transform binHolder;
The binPrefab is basically just a template for an object to be instantiated at run time, and the binHolder is a UI element which will act as the parent of the instantiated objects for the sake of positioning them correctly. With references to these elements, I modified the algorithms to use them. First, where the algorithm creates a list of Bins I also created a list of Sliders which represent the bins in the UI.
List<Bin> bins = new List<Bin>();
List<Slider> binSliders = new List<Slider>();
Then I created an instance of the binPrefab each time a new bin was created, as a child of the binHolder. The binPrefab object had a slider component, so that component was retrieved and adjusted accordingly. The value of the slider was set as (1 – bin.capacity) for a given bin, so as the bin filled with items, the slider expanded from 0 to it’s full height (100 pixels).
Bin b = new Bin();
GameObject g = Instantiate(binPrefab, binHolder);
Sliders = g.GetComponent<Slider>();

if (b.CanFit(item))
{
  b.Add(item);
  s.value = 1f - b.capacity;
}

bins.Add(b);
binSliders.Add(s);
Finally, I made it so that the slider would be updated each time a new item was added to the corresponding bin.
packed = bins[bins.Count - 1].Add(item);
binSliders[bins.Count - 1].value = 1f - bins[bins.Count - 1].capacity;
In the Unity editor, I created a drop down menu to select the algorithm, and hooked it up to test my simple animation system.
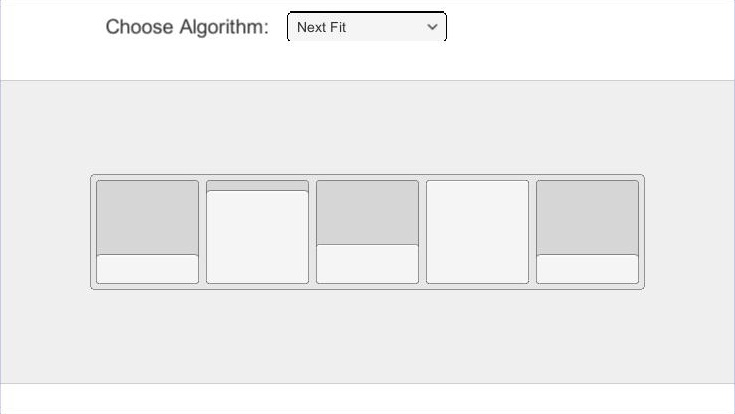
The animation doesn’t show the items within the bins as distinct, it just shows how full each bin is, so it lacks some detail about the situation. In addition to that, there is no way for the user to see or modify the input to the algorithm.
I decided that I would create a new way of filling the bin with several distinct rectangles, whose height represents the size of the corresponding item. To do this, I made a new class called BinFillAnimation, which handled drawing rectangles within a bin. This class simply instantiates an object containing an image, and sets the position so that the images are stacked within the bin area, and sets the height corresponding to the size of the item.
public class BinFillAnimation: MonoBehaviour {

  public GameObject fillPrefab;
  public Transform fillArea;

  public void AddFill(float yPos, float height)
  {
    GameObject fill = Instantiate(fillPrefab, fillArea);
    RectTransform t = (RectTransform)fill.transform;
    t.position += newVector3(0f, yPos, 0f);
    t.sizeDelta = newVector2(t.sizeDelta.x, height);
  }
}
Within the BinPackingAnimation class, I replaced the sliders with BinFillAnimation objects.Note that the height and position of the fill objects are being multiplied by 100f to account for the fact that the bin area is 100 pixels tall. These modifications were made for all of the algorithms.
...

//List<Slider> binSliders = new List<Slider>();
List<BinFillAnimation> binFills = newList<\BinFillAnimation>();

...

//binSliders[bins.Count - 1].value = 1f - bins[bins.Count - 1].capacity;
if (packed)
{
  binFills[bins.Count - 1].AddFill(100f*((1f - oldCapacity) + item / 2), 100f*item);
}

...

Bin b = new Bin();

//GameObject g = Instantiate(binPrefab, binHolder);
//Slider s = g.GetComponent<Slider>();

GameObject g = Instantiate(binFillPrefab, binHolder);
BinFillAnimations = g.GetComponent<BinFillAnimation>();

if (b.CanFit(item))
{
  b.Add(item);
  //s.value = 1f - b.capacity;
  s.AddFill(100f*(item / 2), 100f*item);
}

bins.Add(b);
//binSliders.Add(s);
binFills.Add(s); 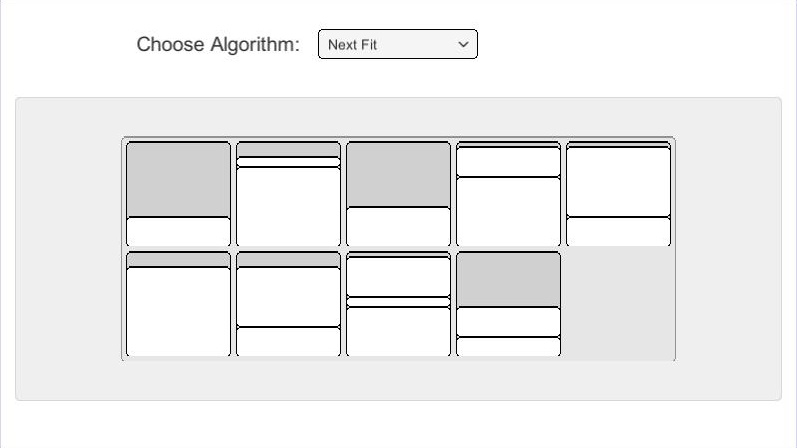
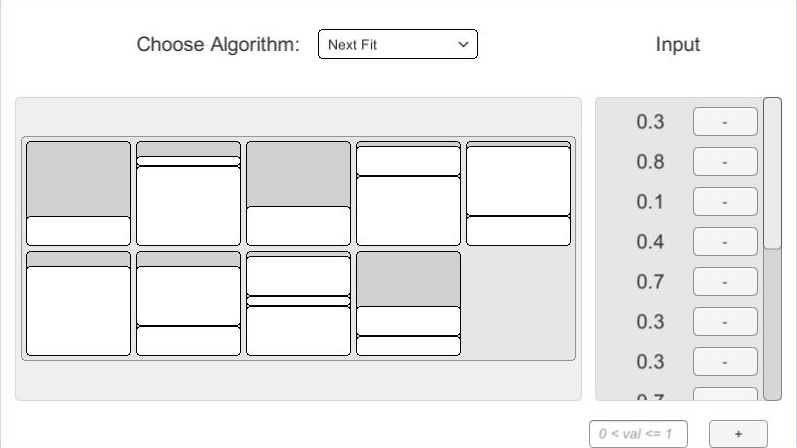
At this point, the core idea of the animation system is working, but there is still no way for the user to see or modify the inputs. I decided to create an input display on the right hand side to show the user the list of sizes. In the Unity editor, I made the UI element which would hold the list, and added two new fields to BinPackingAnimation:
public GameObject inputItemPrefab;
public Transform inputList;
Like before, this is just a template for list items and a holder which will act as their parent. Rather than a grid layout, the inputList object has a vertical layout, and listItemPrefab is just a simple object with a text component. Once displaying the input values worked, I changed the listItemPrefab so it contained a button to remove that item from the list, and I added an input field and an add button to add a new item to the end of the input list. In BinPackingAnimation, I made two functions, ClearInputList and UpdateList which refresh the list when values are added and removed. UpdateList automatically adds the button logic for removing an item when those list items are added. ClearList just removes the instantiated list items.
private void ClearInputList()
{
while(inputList.childCount > 0)
{
DestroyImmediate(inputList.GetChild(0).gameObject);
}
}
public void UpdateList()
{
ClearInputList();
for(int i = 0; i < testValues.Count; i++)
{
GameObject g = Instantiate(inputItemPrefab, inputList);
g.GetComponentInChildren<Text>().text = string.Format("{0}", testValues[i]);
int remIndex = i;
g.GetComponentInChildren<Button>().onClick.AddListener(() => {
testValues.RemoveAt(remIndex);
UpdateList();
});
}
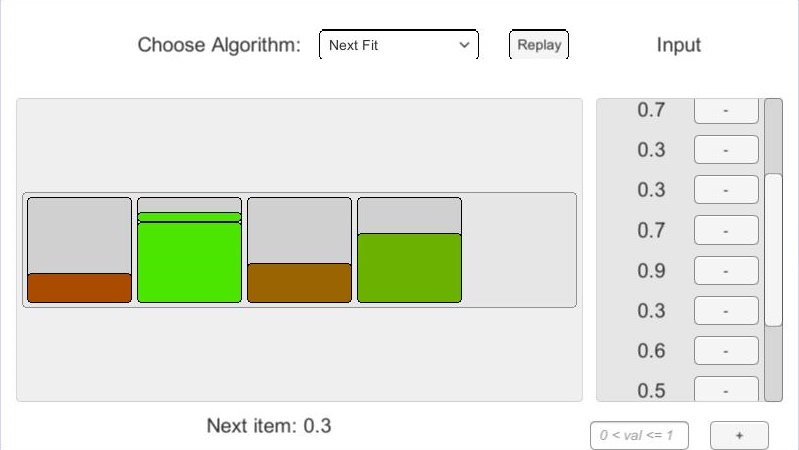
} The logic for adding a new element to the list is contained in a separate script which is added as a component to the add button. It simply gets the value from the input field, makes sure that it’s within the proper range, adds it to the input set, and updates the list displayed to the user. The displayText element see below is just a UI text element that I added to the canvas for printing information. It is also used in the BinPackingAnimation class to let the user know which item is about to be packed in the bins.
public class AddButton : MonoBehaviour
{
  public InputField input;
  public BinPackingAnimation binPackingAnimation;
  public Text displayText;

  public void Add()
  {
    float newValue = float.Parse(input.text);
    if (newValue > 0f && newValue <= 1f)
    {
      binPackingAnimation.testValues.Add(newValue);
      binPackingAnimation.UpdateList();
    }
    else
    {
      displayText.text = "Please enter a value in the range 0 < value <=1";
    }
  }
} 
At this point, the core functionality of the animation system was in place, but there were a few extra modifications I wanted to make. For one thing, I wanted to add colour to make it easier to recognize whether the chosen algorithm was using the space in the bins efficiently. In BinPackingAnimation, I created two Color fields indicating efficient and inefficient use of space, so that the colour of the items could indicate how full a bin is.
I modified BinFillAnimation so that it keeps track of the images representing the items in the bin, and added a Color input to AddFill so that the image colours could be updated as more are added to the bin.
private List<Image> images;
public void Awake()
{
  images = new List<Image>();
}

public void AddFill(Color c,float yPos, float height)
{
  GameObject fill = Instantiate(fillPrefab, fillArea);
  RectTransform t = (RectTransform)fill.transform;
  t.position += newVector3(0f, yPos, 0f);
  t.sizeDelta = newVector2(t.sizeDelta.x, height);
  Image img = fill.GetComponent<Image>();
  images.Add(img);

  // update colors for bin
  foreach (var im in images)
  {
    if (im != null) {
      im.color = c;
    }
  }
}
Then, in BinPackingAnimation, I modified calls to AddFill so that it would linearly interpolate between the two Color attributes based on the capacity of the bin, and pass the interpolated Color into AddFill.
s.AddFill(Color.Lerp(colorA, colorB, b.capacity),100f*(item / 2), 100f*item); 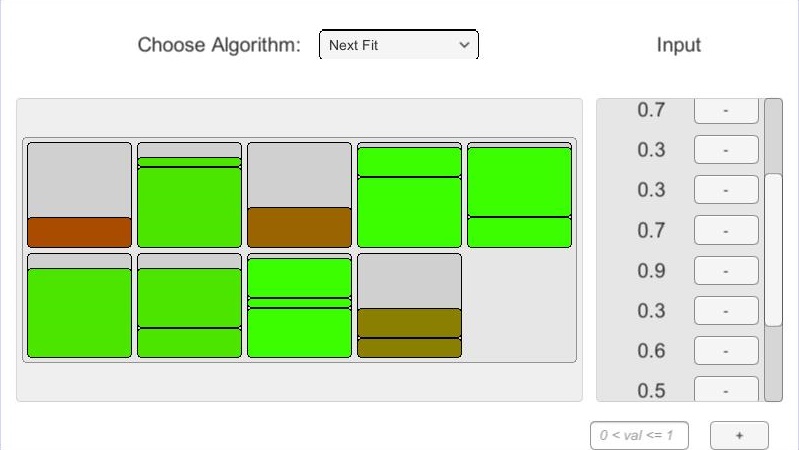
There’s still a problem with this system. In order to replay the animation once it has finished, the user needs to select a different algorithm (or ‘None’) from the dropdown field, and then re-select the algorithm to play. There’s also a bug, where switching algorithms while an animation is running will result in both running at the same time, since co-routines operate asynchronously. To solve these problems, I first modified BinPackingAlgorithm so that it keeps track of the running co-routine and stops it before starting a new co-routine. Then, I added a button which has a reference to the dropdown field and runs the animation based on the value of the dropdown.
public void NextFitAnimation()
{
  if(runningCo != null)
  {
    StopCoroutine(runningCo);
  }
...
} 
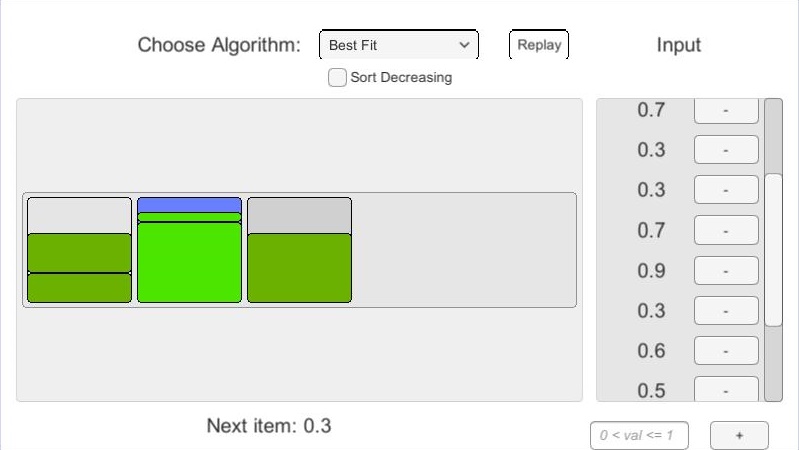
At this point, the animation system was almost complete. I wanted the user to be able to switch between the algorithm and it’s decreasing variation, which each of the algorithms I had implemented has. To do this, I added a toggle button which determines whether or not the algorithm will sort the input decreasingly by size prior to placing the items in bins.
public IEnumerator NextFitCo()
{
  List<float> values = new List<float>(testValues);

  if(sortDecreasingToggle.isOn)
  {
    values.Sort();
    values.Reverse();
  }
...
} 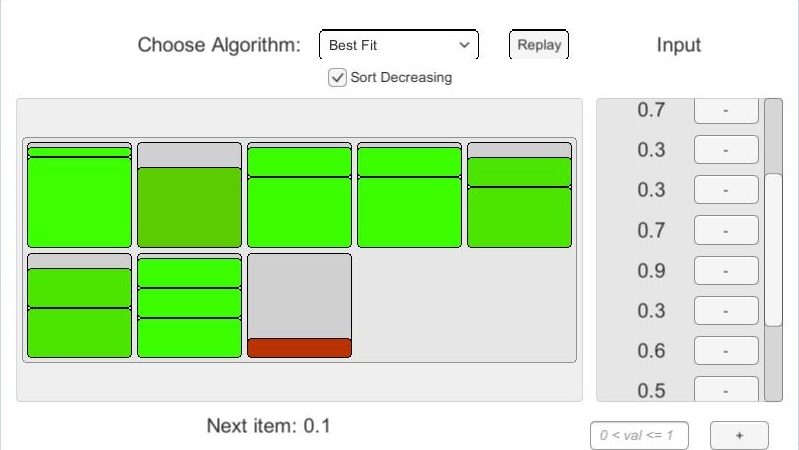
With this final feature, the animation system is just about complete. This system allows users to modify inputs and watch four bin packing algorithms as well as their decreasing variations. The colour scheme helps hint toward whether an algorithm is making efficient use of bin space, which is a quick indicator of how well one of these algorithms might be performing given the current input set.
I added one more feature, which is that the algorithms highlight the background of a bin when they are looking to see if the item will fit. This feature shows that the First Fit, Best Fit, and Worst Fit algorithms loop through each bin to find a spot for the item, while the Next Fit algorithm does not.
While working on this project, I found that the animation helped demonstrate that the Next Fit algorithm tends to use substantially more bins than First Fit, Best Fit, and Worst Fit, however Next fit is faster since it does not have to loop through all of the bins looking for a spot to put the next item.
This concludes the Bin Packing tutorial. To try the project or view the source code, feel free to follow the links below.
Web Demo
View the Project on GitHub